The Kingston Template Walkthrough
- Aug 31, 2023
- 8 min read
Updated: Jun 10, 2024
We hope you will enjoy using The Kingston as much we did when making it! Your site is going to make you stand out in the industry through refined and classic look, channeling simplistic typography and neutral tones.
To kick things off, we wanted to introduce you to what we at IDCO call the “No Panic” buttons. These are built-in so you never have to feel like you broke it. 😘
At the top right of your Wix editor, you’ll see two arrows - one to Undo and one to Redo. Use these whenever you made a change you don’t like and want to go back a step.

Accessing Site History
Additionally, Wix is working hard to autosave your work continuously. If at any point while updating your template you’d like to go back to a previous draft, use your Site History to access it.
In the Wix Editor:
Go to Site in the top menu
Click Site History
Select Continue to Site History
Here you can preview and reinstate previous drafts. In order to ensure your work is not lost, remember to Save your site frequently (we don’t like to rely too heavily on auto save).
——————————————————————————————————————————
PRO TIP: While this guide is in page order and you can go in any order you'd like, we always like to start any site customization by first uploading the portfolio. See PORTFOLIO PAGE section below for steps to do so. Knocking out the portfolio upload first gets project photos ready and organized to make customizing much more seamless!
———————————————————————————————————————————
HOMEPAGE To Upload Your Logo Instead of Text:
Click the text box
Hit the Trash Can in your tool bar on the right (or hit delete on your keyboard)
Hit the "+" sign in the menu on your left
Select Add Image
Upload your Logo
Hit Done
Drag + resize your logo as you'd like
Introducing Strips
Elements across your site are held neatly in place with the help of a building element called a strip.
A strip is a building element that keeps everything in place on your site. It also ensures that your content is responsive when viewed from different devices like mobile, tablet or desktop.
Updating Your Homepage Hero Image
Select the image strip and click Change Strip/Section Background.
In the popup, select Image.
Select your chosen image from your gallery and click Change Strip/Section Background when done.

Change Column Background
Double click on the left column and click Change Column Background. Then select Image, select the image you'd like to add, then click Change Background.

Editing an Image on your Site
Click on the image and a pop up will appear
Click on Change Image to change your image
Select an image from your Media Gallery or Select Upload Media to add a new image

Editing Text Elements
Click on any text and click on the Edit Text button.
That's it!
From here you can format everything from color, font type and size to inserting a Hyper Link to link to other pages or external websites.

Full Width Gallery
This section is setup to automatically pull your featured project photos from your Content Manager, where you'll go to manage your portfolio projects. See the Portfolio section below for steps to add your projects!
Editing the Currently Loving/Shop Highlight
If you have a RewardStyle account and are utilizing the affiliate shop page in your template, this is a great place to feature a few products you've curated for your shop!
This section is currently set to feature a manually created gallery of products. You can also replace the gallery element with a code block to embed a RewardStyle widget.
To edit the product gallery, select the gallery element and click Manage Media. You can then upload photos of each item you'd like to feature and add a corresponding shoppable link to each image.

FOOTER
And now we have reached the end of our Home Page and at a section called the Footer. Your Footer is the bottom of your website that appears on every page of your website—it only needs to be edited once.
Update the placeholder text for SEO purposes—a short and simple description featuring what your business does and the location you serve.
You can then edit each menu button by selecting each button and click Change Text & Icon.

Tip: Don't forget to Save your work at this point!
----------------------------------------------------------------------------
ABOUT PAGE
Your about page contains text elements and portfolio features neatly displayed with the help of Strips.
To update images, click the image column and select Change Strip Background. Then select Image, select the image you'd like to add, then click Change Background.
Text
Click on any text and click on the Edit Text button as you've done before. Update your About Page text to tell your brand story.
----------------------------------------------------------------------------
SERVICES PAGE
This service page was made to be beautiful and straight forward, featuring lovely images of your work and clear text describing your services.
Text Element
Click on any text and click on the Edit Text button.
You can now edit + format everything from color, font type and size. Refer to your Copywriting Guide for our prompts to writing the perfect service page.
Editing a Column Background
Double click on the left column to Change Column Background, select Image, select the image you'd like to add, then click Change Background.
Going down the page, simply edit the text in your Process section and update imagery!
Editing an Image on your Site
Click on the image and a pop up will appear
Click on Change Image to change your image
Select an image from your Media Gallery or Select Upload Media to add a new image
Don't forget to Save your work at this point!
----------------------------------------------------------------------------
PORTFOLIO PAGE
We've developed an entirely bespoke Portfolio for you in The Parker Template. It's the most technical page on your site, but this tutorial will walk you through how to auto-populate new portfolio projects + uploading individual category galleries
ADDING YOUR PORTFOLIO PROJECTS

From your Wix editor navigate to the Content Manager by selecting the second to last icon on the left-hand menu
Select Manage Content
Select Portfolio
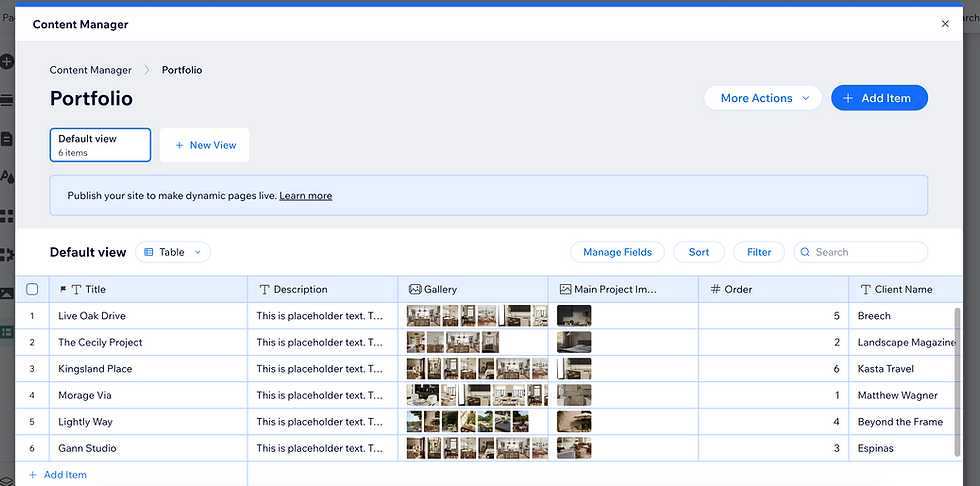
Adding your Portfolio Projects to the Database
The portfolio page is set up as a 'template' for your portfolio project. Unlike the other pages on your site, each project will be updated in your database.
You'll see what looks like a data spreadsheet
The 6 first lines consist of placeholder projects so you can see how each project should appear
You can select each column and update each project with your project content
Click the cell under the Image column, a "+" will appear
Click the "+" to upload the primary (or featured) image which will show on the Portfolio Landing Page
Your photo gallery will appear for you to select the primary photo
Select Add to Page in the lower right corner to save your photo selection
Under the Gallery Column click the "+" to Edit Items

Click the orange Add Media button
In the top left corner, click Upload Media
Upload all of the photos for that specific project
To select more than one in your Media Gallery, hold Command + click
Click Add to Page
Drag and drop your images in the order you'd like them to appear on the individual portfolio page
Click Done
The additional columns will be filled in with your project details.
Leave the last two Columns as they are (the links auto-populate)
Rinse and repeat the steps above for all of your projects. Once everything is all set, you can Publish your site so your projects will be visible in your Editor!
Note: publishing your site will not make your site live to the public unless your domain is connected.
That's it! Feel free to email us at support@idco.studio if you get stuck.
----------------------------------------------------------------------------
SHOP PAGE
With the clean and beautifully laid out design of the Kingston, we added an affiliate shop page so you can share all your favorite products with your followers.
If you have a RewardStyle account and are utilizing the affiliate shop page in your template, this is a great place to feature a few products you've curated for your shop!
Similar to your homepage shop feature, your Shop pages are currently setup to feature a manually created gallery of products. You can also replace the gallery element with a code block to embed a RewardStyle widget (see this post for a walkthrough of updating a code block with RewardStyle code!)
To edit the product gallery, select the gallery element and click Manage Media. You can then upload photos of each item you'd like to feature and add a corresponding shoppable link to each image.

Rinse and repeat these steps for all shop category pages and don't forget to save your work!
----------------------------------------------------------------------------
BLOG PAGE
We've thoughtfully designed your beautiful blog, and Wix makes it super easy to update your blog posts without touching a hint of code! From your Site Dashboard (Site > My Dashboard) select Blog. Here is where you can manage everything for your blog.

From here, you can:
Create a Post - click this to write a new post
Manage existing posts
BLOG EDITOR
When creating or managing posts, you'll be working in your Blog Editor.
Below the post insert, you will find your input buttons.
Add an Image
Add a Gallery
Add a Video
Add a Divider
Insert HTML Code

On the left side of the screen, you will find your Post Settings
Click and a side menu will appear.
Here you can set your:
Categories - you'll want to place your blog post in a category for organization
SEO - Wix does an awesome job walking you through optimizing your blog post for SEO
Author - leave it blank or add a team member
Add an Excerpt - You'll want to add a 3-4 sentence description of your blog post to appear on your blog landing page, as well as in Google search results
Cover Image - this is the primary image of your blog post, a horizontal image will work best
Display Cover Image
Feature This Post - make sure to check this box to ensure it shows in the footer of other blog posts for easy cross reference
----------------------------------------------------------------------------
CONTACT PAGE
Simply edit the text as you have previously!
Editing the Inquiry Form
You can change any question by first selecting the form itself, and then selecting the element and clicking 'Edit Field'.
To add an additional team member to receive notifications of inquiries:
Click Settings
Select Form Settings in the pop up
Click Email Notifications
Click the "X" to save and close
Note: Your inquiry form allows for 10 fields. If your form exceeds 10 fields, you will have to upgrade to a paid Ascend account (Wix's CRM platform)
----------------------------------------------------------------------------
CLIENT PORTAL
For a full video walkthrough of how to set up your Client Portal, click here.
We recommend keeping the Client Portal page as a template, and creating duplicate pages for each client.
To create a copy, head to Pages in your lefthand sidebar. While hovering over the Client Portal page, select the ••• button and click Duplicate Page.

Once duplicated, you can rename the page and customize that page for the specific client. To create a custom link, click the same ••• button and select SEO Basics. From there you can change the URL slug to be a specific client name or project name so you can share a custom, direct link with your client. Note: be sure to create a COPY of the Client Portal page for every client. Screenshots are used for demonstrative purposes only.

You can also add an extra layer of security to the (duplicated) page by password protecting it. In the page settings, select the Permissions tab and the select password. You can then assign a custom password to that specific page to share with your client.

Once your new duplicated page settings are all set, you can jump into the page itself and customize each element for your specific client. Image, text, etc.
The buttons on this page will be used to link to the files you wish to share with your client. To update a button, select the button you wish to update and select the link icon.

In the popup window, select Document from the lefthand sidebar. From there, select Choose File.

Your document library is separate from your media library, so here you can upload non-image files (PDF, DOC, etc.) that you'd like your button to link to that your client with the direct link can access.
Rinse and repeat for each button on the page!
--------------------------------------------------------------------------
You're all set! Remember to reach out to us at support@idco.studio if you get stuck, or reach out in the Facebook group for design ideas and further support.


